How to Make Crème Brûlée Without a Torch: Broiler and Sear Gun Methods Compared
You do not need a blowtorch to make crème brûlée. You need a cold, set custard, a thin layer of sugar, and a heat source you can aim with some precision. The caramelized top is the last minute of a project that started the night before, and both an oven broiler and a small kitchen sear gun will get you there. They just ask different things of you.
Before the Sugar: Three Things That Have to Be True
Most cracked, weeping, or grainy brûlées were doomed before anyone turned on a flame. Check these first.
- The custard is fully set and genuinely cold. Bake in a water bath at 325°F until the edges are firm and the center wobbles like set gelatin when you nudge the ramekin; a thermometer in the middle should read 170°F to 175°F. Cool to room temperature, then refrigerate at least four hours, preferably overnight. A warm or under-set custard slumps the second heat hits it.
- The surface is dry. Blot it gently with a paper towel right before sugaring. Condensation or stray custard steams under the sugar, and steam turns your crust into clumps.
- The dish is right. Shallow, wide, oven-safe ceramic gives you more surface area and fewer surprises than a tall narrow ramekin or thin decorative glass.
Then there's the sugar itself. Superfine (caster) sugar melts fastest and most evenly. Granulated works if you give it a moment longer. Turbinado or demerara delivers a louder crunch but melts unevenly, so expect a few pale patches. Skip powdered sugar entirely — the starch in it scorches long before the sugar caramelizes.
Method One: The Oven Broiler
This is the method almost everyone already owns, and the one that demands the most attention.
Step by step
- Set an oven rack so the tops of your ramekins will sit four to six inches below the heating element. Closer for a fast, aggressive sear; farther if your broiler runs hot.
- Turn the broiler to high and preheat a full ten minutes. A lukewarm broiler gives you one burnt edge and three pale ones.
- Pull the custards from the fridge and let them stand five minutes. Refrigerator-cold ceramic going straight under a screaming element is hard on the dish.
- Sprinkle one to two teaspoons of sugar over each custard. Tilt and tap the ramekin to spread it thin and even, then pour the excess back into the bowl.
- Set the ramekins on a sheet pan and slide them under the element. Do not walk away. Not for the phone, not for the trash.
- Watch the sugar melt, bubble across the entire surface, then turn the color of dark honey. Two to five minutes is typical, but your broiler sets the clock.
- Rotate the pan halfway through if your broiler has hot spots. Pull the custards the moment the sugar evens into amber — it keeps darkening off the heat.
- Let them stand two minutes so the sugar hardens, then serve.
The catch is that all that overhead heat warms the custard underneath. If yours soften more than you like, chill them 20 to 30 minutes after caramelizing, but know the crust starts to weep and go soft the longer it sits. For most people, the fix is simply to serve sooner.
Method Two: The Sear Gun
A sear gun — the small butane or propane torch sold for sous vide, meringue, and melting cheese — gives you a flame you can point at one square inch at a time. That control is the entire advantage.
Step by step
- Sugar the custards exactly as above: one to two teaspoons each, thin and even, excess tapped off.
- Work in a well-ventilated spot, well away from paper towels, curtains, and anything that has ever been called a dish towel.
- Hold the gun four to six inches from the surface and keep it moving in slow circles. A stationary flame drills a crater; a moving one builds an even sheet.
- Let the sugar melt and bubble before you chase color. You'll watch it go from opaque white to wet-looking to clear, then to amber. Keep moving the whole time.
- Work in two thin passes rather than one heavy one. A second pass over a set first layer builds an even crust without scorching.
- Serve as soon as the bubbling stops — usually within a minute or two.
The gun barely warms the custard, which is exactly what you want. The trade-offs are fuel, ventilation, and hands: a small butane tank can fade halfway through the fourth ramekin, and a live flame in a cramped kitchen is not a low-attention tool.
Which Method Should You Use?
- Choose the broiler when you're making six or eight custards at once, your broiler is reliable, and you're willing to stand at the oven for five straight minutes.
- Choose the sear gun when you're doing two or four, when your broiler is weak or wildly uneven, or when you want the custard to stay as cold as possible.
- Or go old school: a brûlée iron or a metal spoon heated until glowing, pressed directly onto the sugar. It works beautifully in small patches, but it is slow, and you need a thick handle and a gas burner.
Reading the Sugar: Doneness Cues
Whatever heat source you use, the sugar tells you where it is. Learn these four stages and you'll stop guessing.
- White and gritty: not enough heat yet. Keep going in short bursts — sugar that cools mid-melt re-crystallizes into a grainy sheet.
- Clear and bubbling across the whole surface: nearly there. This is the moment to stop looking away.
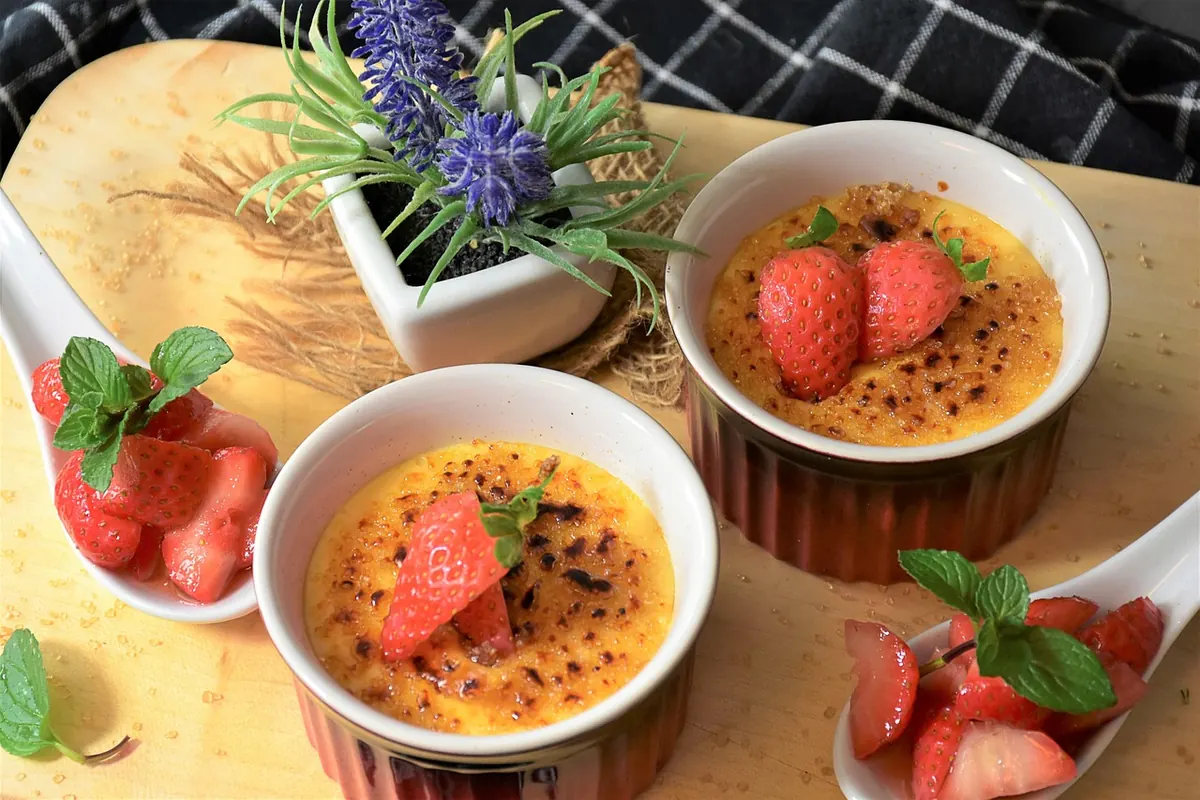
- Amber, the color of dark honey or an old copper penny: done. Pull it immediately.
- Black spots and a sharp, acrid smell: burnt, and bitter. There's no rescuing it. Scrape it off, wipe the custard surface dry, and start the crust again.
A finished crust should be thin enough to shatter under the back of a spoon yet thick enough to stay glassy for a few minutes. If it bends instead of cracking, your sugar layer was too heavy.
Safety Notes That Actually Matter
- Never leave a broiler unattended. Sugar goes from amber to black in seconds, and smoke alarms are unforgiving.
- Sugar burns are worse than water burns: melted sugar sticks to skin and keeps cooking. Keep a bowl of cold water within reach and use tongs, not fingers, to move hot ramekins.
- Never refill a sear gun near a pilot light, a gas burner, or any other flame. Let the nozzle cool completely before storing it.
- Point the flame away from your face, hair, and hands, and keep the can upright. Tilted cans spit.
- Use only oven-safe ceramic or tempered glass. A thin decorative dish can crack under a broiler.
Serving, Timing, and Last-Minute Fixes
Caramelize as close to serving as you reasonably can. The magic of crème brûlée is the temperature contrast — hot, brittle sugar over cold, dense custard — and that contrast fades within about fifteen minutes as the crust absorbs moisture and softens.
The custards themselves keep beautifully, covered, for up to three days in the fridge. Do the sugar only at the end. If a crust softens before your guests sit down, resist the urge to hit it again with heat; a second pass over an already-set layer usually burns the sugar and warms the custard. Scrape it off, dry the surface, and redo it in a thin fresh layer. It takes two minutes, and it's the difference between a brûlée that cracks under a spoon and one that bends.
Photo: RitaE / Pixabay